It will soon be Easter Time again, and now is the time to get busy planning on what you will be viewing for the holiday.
This year, like those in the past will be different, and hopefully interesting, and inspirational to you, and yours!
Showing posts with label Easter. Show all posts
Showing posts with label Easter. Show all posts
Tuesday, March 7, 2023
Thursday, March 8, 2018
Easy Easter Crafts: Cardboard Cut Out and a Primitive Rabbit on Wood Hom...
Two East and Enexpensive Easter Crafts
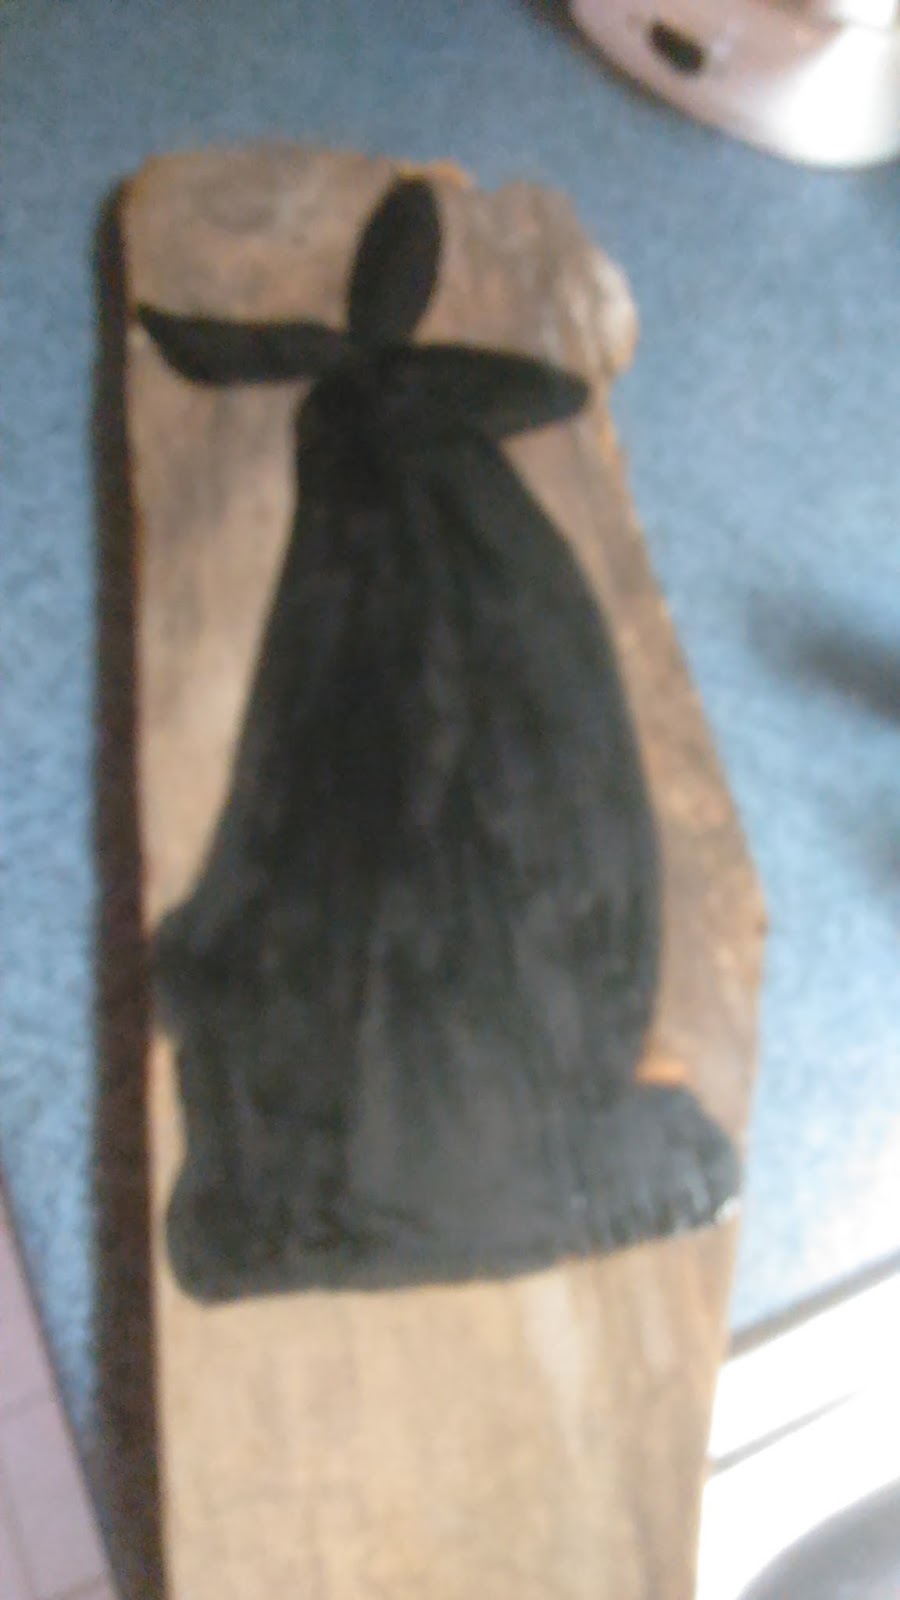
First a Primitive Rabbit on Wood, and Second a Cardboard Cut Out Bunny
Like most of my homemade crafts, I like them to be done in a very short period of time, and made from things that I already have in the house, and recycled materials.

First for the primitive Rabbit on wood, I went down to the basement and chose a piece that I thought I could work with.
I sanded it, to clean off the dirt, and then drew the outline and painted my rabbit silhouette in black acrylic. Don't over think it, just draw and paint it.

Next I highlighted areas in white, like the arms, tail, mouth ears, and eyes. Finally, to give it an aged look, I sanded away some of the paint. I finished it by giving it a coat of polyurethane. Finally, the fun part, I hang it outside the front door.

On to the next bunny.
First I got my piece of cardboard, and drew the shape of bunny I wanted. Easy enough.
Next I was ready to cut out the bunny, and I painted it with a brown paint, but feel free to make it any color you choose.


I then spattered black paint using a tooth brush, cut and ties a ribbon around it's neck for decoration, and after that the bunny was all ready for Easter. If you choose to try out any of these craft projects please let me know how it went!

First a Primitive Rabbit on Wood, and Second a Cardboard Cut Out Bunny
Like most of my homemade crafts, I like them to be done in a very short period of time, and made from things that I already have in the house, and recycled materials.
First for the primitive Rabbit on wood, I went down to the basement and chose a piece that I thought I could work with.
I sanded it, to clean off the dirt, and then drew the outline and painted my rabbit silhouette in black acrylic. Don't over think it, just draw and paint it.

Next I highlighted areas in white, like the arms, tail, mouth ears, and eyes. Finally, to give it an aged look, I sanded away some of the paint. I finished it by giving it a coat of polyurethane. Finally, the fun part, I hang it outside the front door.

On to the next bunny.
First I got my piece of cardboard, and drew the shape of bunny I wanted. Easy enough.

Next I was ready to cut out the bunny, and I painted it with a brown paint, but feel free to make it any color you choose.


I then spattered black paint using a tooth brush, cut and ties a ribbon around it's neck for decoration, and after that the bunny was all ready for Easter. If you choose to try out any of these craft projects please let me know how it went!

Monday, February 26, 2018
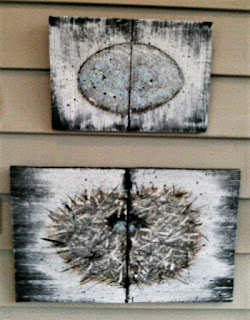
How to create your own Primitive and Stunning Easter Decorations DIY Crafts
Easter Decorating made easy. Primitive, and Stunning Easter Crafting in no time at all!
 Looking for a not so typical Easter Craft Project that the entire family can take part in
Look no further, because here it is. Not only do these pieces look great, but they really are easy, and quick to do, and will certainly brighten up your home for the Easter Season. In fact they are nice enough to leave out all year long!
Though the video will explain everything you need to know step by step, I will also post some of the photos, and give a brief synopsis of what I have done to create these one of a kind little art projects.

After you have picked out your wood shapes, you can base coat them in black. Black is very important, because you will be uncovering some of that color latter in the process.
 Dry brushed a little white on top of the black, tie a jute cord in the middle (if you wish it to look like two boards when you are finished). Next you can begin layering your colors. I chose brown, then beige, blue, and finally a little white.


For the birds nest, get a tool with a sharp end to scrape across the nest to simulate sticks. When you scrape it you will see the black underneath is what helps the nest to look like many separate sticks woven in to a nest.

Finally, spatter black on to the pieces with a tooth brush. Doing this will add depth to the piece, and believe me, it does a lot for the finished project.

Now you can remove the jute cord (if you used it) I also used 2 screws, and jute cord on the back to create a way to hang the boards.
I hope you will try this fun, and different kind of Easter Craft for your home, and please let me know what you thought of it!

Look no further, because here it is. Not only do these pieces look great, but they really are easy, and quick to do, and will certainly brighten up your home for the Easter Season. In fact they are nice enough to leave out all year long!
Though the video will explain everything you need to know step by step, I will also post some of the photos, and give a brief synopsis of what I have done to create these one of a kind little art projects.

After you have picked out your wood shapes, you can base coat them in black. Black is very important, because you will be uncovering some of that color latter in the process.


For the birds nest, get a tool with a sharp end to scrape across the nest to simulate sticks. When you scrape it you will see the black underneath is what helps the nest to look like many separate sticks woven in to a nest.

Finally, spatter black on to the pieces with a tooth brush. Doing this will add depth to the piece, and believe me, it does a lot for the finished project.

Now you can remove the jute cord (if you used it) I also used 2 screws, and jute cord on the back to create a way to hang the boards.
I hope you will try this fun, and different kind of Easter Craft for your home, and please let me know what you thought of it!
Tuesday, February 13, 2018
No Cost Low Cost Exquisite Easter Crafts you can make Yourself. Primitive Rabbit
Looking for an easy DIY Craft for you and the kids?

How about this primitive Rabbit? It looks great, it's very easy, and may cost you nothing to do. Also, if you have kids, it's simple enough that they will find it fun too!
A Primitive Easter Rabbit, or even for an everyday decoration in the home, that you can make by yourself in about an hour. This is a very easy no cost, or low cost craft that is fun, and quick for anyone to try out.

Begin by drawing your selected image onto the piece of cardboard. I know, it's cardboard, but don't worry, it's going to look great when you are finished. You won't believe your eyes.
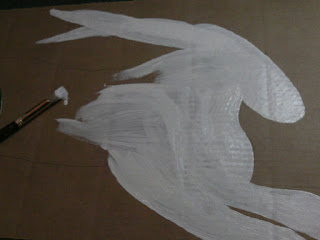
Paint your image. Don't worry about the areas that show through underneath, it will only add to the "aged" look of the piece. After all, it is a primitive, and that is what gives them their charm.

Next you can add your shading, and spots of "wear" to the piece, and cut it out. Note: For me, cutting it out was actually the hardest part of the entire prokect. Now the fun part! It is ready for a little fancy decorating, as you see fit. I used a few twigs from the yard, Spanish moss, and left over ribbon for mine.

You are all finished, and ready to put it on display. These pieces are very fast, and also easy enough for kids to do as well.
Below are a few more Rabbits that I have added to my collection, and as you can see, they are wonderful, fun, and festive! I hope you try this project, and as always, if you do...let me know!

The Dining Room Table Rabbit

Rabbit in the Fireplace

Two Bunnies in a Bedroom
Friday, March 11, 2016
Making Inexpensive Easter Crafts in no time!


As you can see, on the left, I have already started on the ceramic pieces that I wish to do. They have their base coat of black, and on one of them I have started dry brushing on the white paint for the bunny.


Wednesday, March 9, 2016
Decorating for Easter, it's fun and easy!


On the left you can see my fireplace. On top are 2 square baskets with blue grass, and 2 tall silk flowers. Sitting atop the grass are silver and gold eggs. In the center of the fireplace is an Easter Egg wreath, and at the bottom of the fireplace sits another Easter basket decorated with silk flowers, colorful ribbon, and Easter eggs, and this took no time at all.

Now, don't you feel like bringing a little bit of happiness, and fun to your own home? To see what else was done on the inside of the house just follow the link to the photos. Click Here
Subscribe to:
Posts (Atom)