And here it is in what is probably it's finished state. Pre-framed.
Showing posts with label quick. Show all posts
Showing posts with label quick. Show all posts
Tuesday, March 1, 2022
Create! I Felt Like Doing A Painting Today
It seemed to be the right day for doing a painting. You get to see it being done step by step.
And here it is in what is probably it's finished state. Pre-framed.

And here it is in what is probably it's finished state. Pre-framed.
Thursday, May 28, 2020
From Old Wooden Pallet to Nice Garden Decor at No Cost
Today we are creating a little more primitive garden decor, this time out of a discarded wooden pallet. It took very little time, and cost nothing since I always have craft paints. Hopefully you will like this (don't forget to hit "like"), and subscribe for even more great decorating ideas. Also check out the other videos for more inspirational decorating ideas, for you and the kids, on a budget!
Thursday, October 4, 2018
Make A Primitive, Spooky Halloween Trio!

It's that wonderful, magical, and haunting time of year again, and I have come up with a very quick and easy project to help get you in the Halloween mood.
Just follow the easy step by step instructions below, and you will be haunting in no time!

Begin by choosing your piece of wood. Draw the desired Halloween shapes you would like. Choose the colors, and begin painting. Remember, it's a primitive piece, so you don't have to be perfect.

One by one the project begins to take shape. As you fnish painting the base color you can begin to see what it is going to look like. Now we can begin putting in the details!

Give your ghoulish creature eyes, nose, and a mouth. A little touch of red on their eyes adds to the spookiness. I dipped a tooth brush in white paint, and spattered the entire piece with it. It adds to the look.

I also outlined the cat with white paint to bring him out of the background. Add a little string to hang your piece by, and it's all ready to put out! Happy Haunting, and Please Subscribe to the You Tube Channel for more!!!
Thursday, March 8, 2018
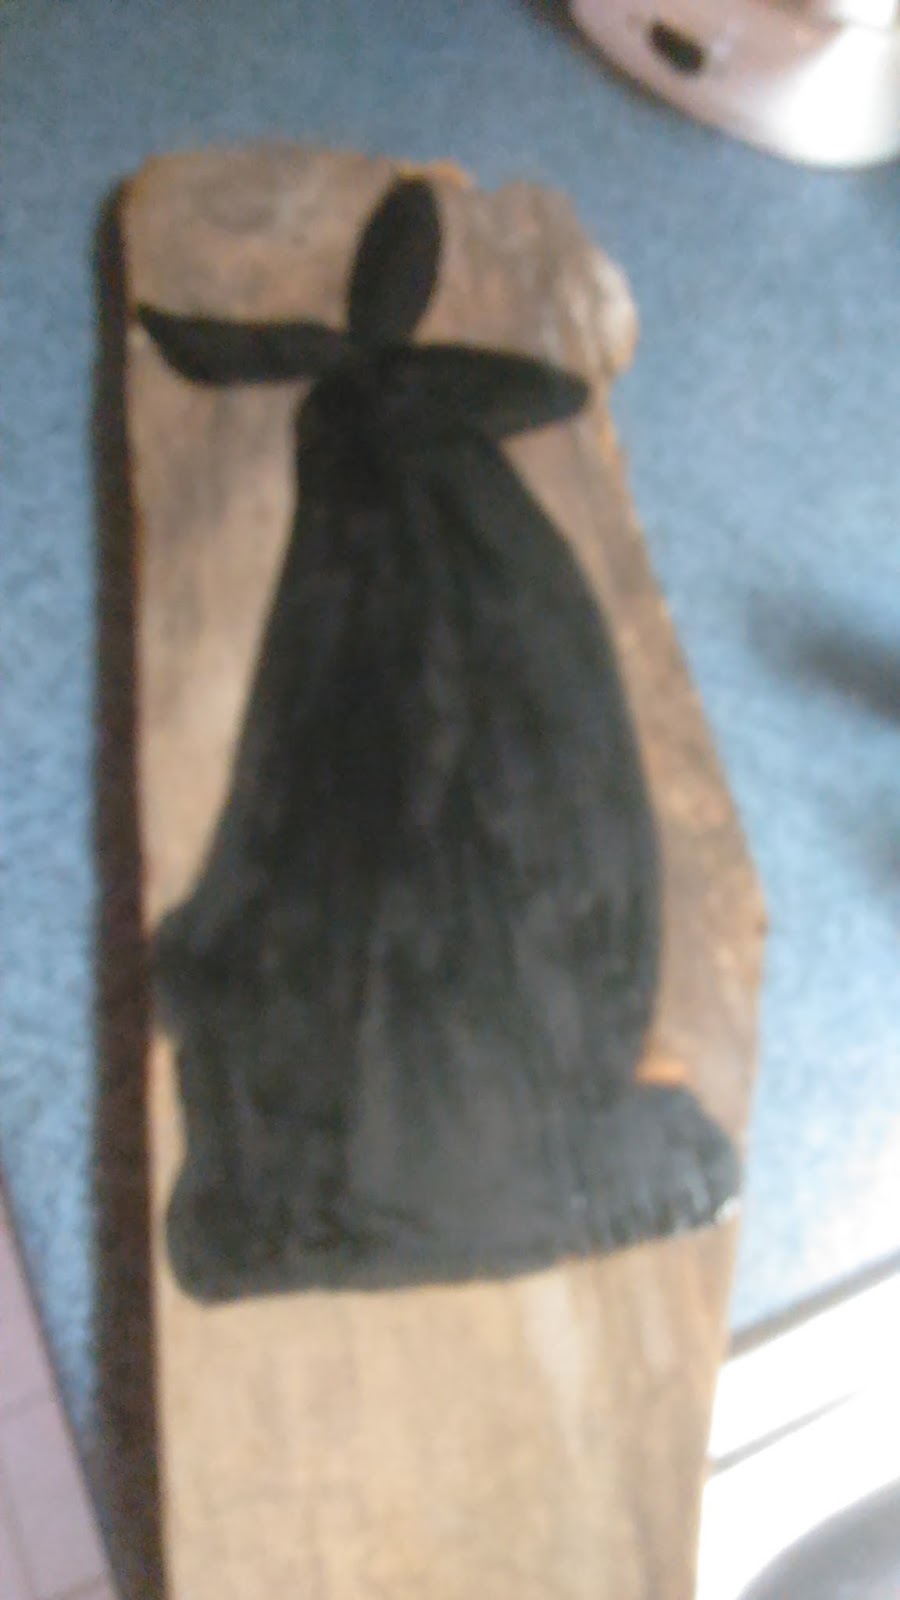
Easy Easter Crafts: Cardboard Cut Out and a Primitive Rabbit on Wood Hom...
Two East and Enexpensive Easter Crafts
First a Primitive Rabbit on Wood, and Second a Cardboard Cut Out Bunny
Like most of my homemade crafts, I like them to be done in a very short period of time, and made from things that I already have in the house, and recycled materials.

First for the primitive Rabbit on wood, I went down to the basement and chose a piece that I thought I could work with.
I sanded it, to clean off the dirt, and then drew the outline and painted my rabbit silhouette in black acrylic. Don't over think it, just draw and paint it.

Next I highlighted areas in white, like the arms, tail, mouth ears, and eyes. Finally, to give it an aged look, I sanded away some of the paint. I finished it by giving it a coat of polyurethane. Finally, the fun part, I hang it outside the front door.

On to the next bunny.
First I got my piece of cardboard, and drew the shape of bunny I wanted. Easy enough.
Next I was ready to cut out the bunny, and I painted it with a brown paint, but feel free to make it any color you choose.


I then spattered black paint using a tooth brush, cut and ties a ribbon around it's neck for decoration, and after that the bunny was all ready for Easter. If you choose to try out any of these craft projects please let me know how it went!

First a Primitive Rabbit on Wood, and Second a Cardboard Cut Out Bunny
Like most of my homemade crafts, I like them to be done in a very short period of time, and made from things that I already have in the house, and recycled materials.
First for the primitive Rabbit on wood, I went down to the basement and chose a piece that I thought I could work with.
I sanded it, to clean off the dirt, and then drew the outline and painted my rabbit silhouette in black acrylic. Don't over think it, just draw and paint it.

Next I highlighted areas in white, like the arms, tail, mouth ears, and eyes. Finally, to give it an aged look, I sanded away some of the paint. I finished it by giving it a coat of polyurethane. Finally, the fun part, I hang it outside the front door.

On to the next bunny.
First I got my piece of cardboard, and drew the shape of bunny I wanted. Easy enough.

Next I was ready to cut out the bunny, and I painted it with a brown paint, but feel free to make it any color you choose.


I then spattered black paint using a tooth brush, cut and ties a ribbon around it's neck for decoration, and after that the bunny was all ready for Easter. If you choose to try out any of these craft projects please let me know how it went!

Monday, February 26, 2018
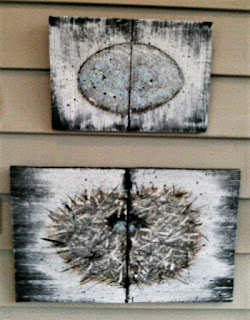
How to create your own Primitive and Stunning Easter Decorations DIY Crafts
Easter Decorating made easy. Primitive, and Stunning Easter Crafting in no time at all!
 Looking for a not so typical Easter Craft Project that the entire family can take part in
Look no further, because here it is. Not only do these pieces look great, but they really are easy, and quick to do, and will certainly brighten up your home for the Easter Season. In fact they are nice enough to leave out all year long!
Though the video will explain everything you need to know step by step, I will also post some of the photos, and give a brief synopsis of what I have done to create these one of a kind little art projects.

After you have picked out your wood shapes, you can base coat them in black. Black is very important, because you will be uncovering some of that color latter in the process.
 Dry brushed a little white on top of the black, tie a jute cord in the middle (if you wish it to look like two boards when you are finished). Next you can begin layering your colors. I chose brown, then beige, blue, and finally a little white.


For the birds nest, get a tool with a sharp end to scrape across the nest to simulate sticks. When you scrape it you will see the black underneath is what helps the nest to look like many separate sticks woven in to a nest.

Finally, spatter black on to the pieces with a tooth brush. Doing this will add depth to the piece, and believe me, it does a lot for the finished project.

Now you can remove the jute cord (if you used it) I also used 2 screws, and jute cord on the back to create a way to hang the boards.
I hope you will try this fun, and different kind of Easter Craft for your home, and please let me know what you thought of it!

Look no further, because here it is. Not only do these pieces look great, but they really are easy, and quick to do, and will certainly brighten up your home for the Easter Season. In fact they are nice enough to leave out all year long!
Though the video will explain everything you need to know step by step, I will also post some of the photos, and give a brief synopsis of what I have done to create these one of a kind little art projects.

After you have picked out your wood shapes, you can base coat them in black. Black is very important, because you will be uncovering some of that color latter in the process.


For the birds nest, get a tool with a sharp end to scrape across the nest to simulate sticks. When you scrape it you will see the black underneath is what helps the nest to look like many separate sticks woven in to a nest.

Finally, spatter black on to the pieces with a tooth brush. Doing this will add depth to the piece, and believe me, it does a lot for the finished project.

Now you can remove the jute cord (if you used it) I also used 2 screws, and jute cord on the back to create a way to hang the boards.
I hope you will try this fun, and different kind of Easter Craft for your home, and please let me know what you thought of it!
Monday, August 28, 2017
How to make your own Ghost, DIY, Primitive Crafts
DIY How to make your own Ghost/Spirit for Halloween, or all year long if your creepy. You won't believe how easy this is. #Budget #Recycle #DIY
This little guy took no time at all, and saved me a lot of money from the one that I was thinking of buying online. It was everything I had wanted in a primitive ghost, and it only cost me a little time, paint, and recycled wood. Best of all...I did it myself!
This little guy took no time at all, and saved me a lot of money from the one that I was thinking of buying online. It was everything I had wanted in a primitive ghost, and it only cost me a little time, paint, and recycled wood. Best of all...I did it myself!

Monday, January 9, 2017
How to make a Burlap Wreath a DIY Tutorial
I hate the thought of spending money on things I think I can do myself, so we are going to make a Spring/Summer wreath decoration for my entry door. As it turns out it is very easy, and inexpensive, and fun as well!
Monday, November 28, 2016
Make your own Primitive Santa in no time!

Friday, March 11, 2016
Making Inexpensive Easter Crafts in no time!


As you can see, on the left, I have already started on the ceramic pieces that I wish to do. They have their base coat of black, and on one of them I have started dry brushing on the white paint for the bunny.


Thursday, December 3, 2015
A brief history of the Snow Globe, and how you can make your own.
Video Below
 Erwin Perzy, came up with the idea by accident in 1900.
Mass production started in Vienna in 1905, and 108 years later, the company - Original Vienna Snow Globes - is still going strong.
Mr Perzy III has been in charge since the early 1980s and the company, despite having only 30 employees, 15 of which work from home, produces about 200,000 snow globes a year.
Erwin Perzy, came up with the idea by accident in 1900.
Mass production started in Vienna in 1905, and 108 years later, the company - Original Vienna Snow Globes - is still going strong.
Mr Perzy III has been in charge since the early 1980s and the company, despite having only 30 employees, 15 of which work from home, produces about 200,000 snow globes a year.
 Nowadays kids have everything... I mean, they have computers and lots of other electronic things, and our snow globe has nothing, no battery, no nothing, Erwin Perzy III.
Unlike cheaper rivals from the Far East, the company's snow globes are handpainted and manually assembled, and the actual globe is still made of glass rather than plastic.
Nowadays kids have everything... I mean, they have computers and lots of other electronic things, and our snow globe has nothing, no battery, no nothing, Erwin Perzy III.
Unlike cheaper rivals from the Far East, the company's snow globes are handpainted and manually assembled, and the actual globe is still made of glass rather than plastic.
 This is all you need to create your own Mason Jar Snow Globe.
1: Waterproof superglue
This is all you need to create your own Mason Jar Snow Globe.
1: Waterproof superglue
2: Something to put inside. Mini Christmas trees, ornaments, a small house, snowman, toys will work.
3: Glycerin (available at crafts stores)
4: Distilled water (distilled water and glycerin in a ratio of 1:1 for best results!)
5: Glitter, or Fake Snow like crushed glass. Instructions:
Use glue to adhere your trinket to the inside of the jar lid. Dry about 24 hours.
Fill jar with enough water/glycerin to fully submerge your toy. Add the desired amount of glitter.
Use glue to adhere lid to the jar's metal screw band. Let dry.
Apply glue to the lid's inner edge, and screw onto jar. Let dry completely before shaking. You can also make "dry" Snow Globe Mason Jar scenes, just leave out the water and glycerin. Not to mention, you can also decorate the outside of the Mason Jar, and put a little battery candle in it. What ever you would like to do, after all, it is yours to create. Just have fun doing it!


2: Something to put inside. Mini Christmas trees, ornaments, a small house, snowman, toys will work.
3: Glycerin (available at crafts stores)
4: Distilled water (distilled water and glycerin in a ratio of 1:1 for best results!)
5: Glitter, or Fake Snow like crushed glass.

Use glue to adhere your trinket to the inside of the jar lid. Dry about 24 hours.
Fill jar with enough water/glycerin to fully submerge your toy. Add the desired amount of glitter.
Use glue to adhere lid to the jar's metal screw band. Let dry.
Apply glue to the lid's inner edge, and screw onto jar. Let dry completely before shaking.

Tuesday, December 1, 2015
You can make Old Time Christmas Decorations with your Ornamental Grasses!
What to do with those Ornamental Grasses? Video Below.
 You can make Old Time Christmas Decorations with your Ornamental Grasses!

 Directions:
1: Start by cutting the grass.
2: Choose a shape, or shapes, and tie with twine. I did 4 different ones for the inside of the house.
3: Decorate as you see fit. You can secure it to the twine, or use hot glue. You are limited only by your imagination.
See how easy that was! Since you know that you will have more Ornamental Grasses next year, you can just take off your decorations, compost this grass, and start fresh next year. If you are like me you will have a different idea of what you would like next year anyway.
 Be sure to let me know in the comments if you like this idea, and especially if you intend to do your own Old Time Christmas Decorations. They are very inexpensive to do, and easy as well.


1: Start by cutting the grass.
2: Choose a shape, or shapes, and tie with twine. I did 4 different ones for the inside of the house.
3: Decorate as you see fit. You can secure it to the twine, or use hot glue. You are limited only by your imagination.
See how easy that was!


Wednesday, September 9, 2015
Get a French Country look in no time!

Have you always wanted to change a dull, drab room, but you didn't know where to start? Let's change all of that now, and get to the room that you want to come home to!
1. Empty the room, and choose a neutral palette, you will be adding accents of color, so don't fret. A neutral palette gives an air of calm to the room. Pillows, paintings, throws, and Persian rugs can give color accents.


Subscribe to:
Posts (Atom)