Fall is here, and money is tight, but don't worry...This YouTube Channel has this video, and many others designed to save you decorating money all the time!
Here is another good looking, and cheap Fall/Halloween craft idea anyone can make.
Please subscribe to the YouTube Channel if you haven't already for more paintings, and crafty ideas!!!
Showing posts with label holidays. Show all posts
Showing posts with label holidays. Show all posts
Wednesday, September 21, 2022
Wednesday, January 19, 2022
One Valentine's Day, Two Different Looks. Which is Better Traditional o...
We are trying out two different looks for Valentines Day decorating to see which we like the best. These are very easy crafts that you can do with the kids, and they cost very little in time, or cash, but they still look great. Let me know what you think.
If you wish to see more inexpensive decorating ideas for the Holidays, or everyday, please subscribe to the YouTube Channel!!!
If you wish to see more inexpensive decorating ideas for the Holidays, or everyday, please subscribe to the YouTube Channel!!!
Tuesday, December 21, 2021
Create Your Own Primitive Christmas Tree In No Time!
There is always time for another Easy Christmas Craft! Especially one that takes so little time to do. You will love this little Christmas Tree, and the ease of the project!


Monday, November 29, 2021
Easy Craft Projects a Primitive Candy Cane Sign
Today we are doing a very easy DIY project. I have seen these around, but why pay for one when you can make your own?!?
The making of a Primitive Candy Cane Sign for Christmas. I had seen for sale on the internet, but why not just make our own out of leftover wood, and paint we already have, so it cost us nothing but very little time! This is a very easy project taking up little time to finish. I hope you try it out for your Christmas decor, and let me know what you think!
We start with out piece of wood.


Next we base coat it with black.

We move on to painting the candy cane, and lettering.

Finally we have sanded it all, for the aged effect, and we are finished! Wasn't that easy?
Monday, November 22, 2021
How to get the French Country Christmas Look! 60 plus photos for Inspira...
Today we are learning how to create that French Country Christmas look for very little money, and using what you would already have around the house. You need only your old pieces, glass bottles, white, or metal vases, greenery, and sticks from the yard, favorite light colored Christmas ornaments, light throws, pillows, picture frames, and such. Watch for inspiring ideas. It's really pretty simple to do, and takes very little time. It's fun just going around the house looking for everyday objects to add to your own look! Please Subscribe to the YouTube Channel for more!!!
There is something very calming, ans screne about a French Country Christmas, and for everyday for that matter. As the years go by I am using it more, and more in the house. Below are some of my ideas for this Christmas.


There is something very calming, ans screne about a French Country Christmas, and for everyday for that matter. As the years go by I am using it more, and more in the house. Below are some of my ideas for this Christmas.


Thursday, November 18, 2021
The Making of a Christmas House. French Country Style Decorating.
This year the Old Haunted House takes on a simpler, brighter French Country theme, with more white, and lighter colors in the Christmas decorating.
Join me for this step by step video of how I achieved the look.
We have brought everyday pieces from around the house, and some of the white, and light Christmas peices that fit, along with a few new handmade craft pieces for the look we wanted.


Join me for this step by step video of how I achieved the look.
We have brought everyday pieces from around the house, and some of the white, and light Christmas peices that fit, along with a few new handmade craft pieces for the look we wanted.


Thursday, October 14, 2021
Easy Fall Crafts I have made, and you can too!
Here we have 3 very easy to do Fall craft projects you can make by yourself, or with the kids. Easy enough that everyone can get involved.
Decorating for fall doesn't need to cost a lot of money, just use what you already have, and change it up a little. Using your imagination is all of the fun, and you come up with a unique look for your home!


Decorating for fall doesn't need to cost a lot of money, just use what you already have, and change it up a little. Using your imagination is all of the fun, and you come up with a unique look for your home!


Monday, January 11, 2021
Whitewashed, French Country, Valentines Day Decorating Ideas You can Make
Here I have a few very easy, and low, or no cost decorating ideas for Valentines Day, and even year around using a French Country decorating theme.

First we covered a couple of old cigar boxes with a few French Country wallpaper prints we found on the internet. We just saved the photos, and copied them out. Pretty easy so far...
Just put some glue on the back of the paper, and place them on the boxes where you wish. All you have to do then is wait for them to dry.
I think they turned out very nice.

Next we found some fabric, and sewed it into a heart shape, put a little whiet on it by dry brushing, and used one of our French Country stencils, in gold paint, to give it a little flare.
I had tried bleaching the fabric, but that color just didn't want to fade, hence the whitewash painting technique. That was o.k., as I got to use a stencil over that!
We also had a cherbu, so it got a coat of off white paint, and was ready to go.

All in all, it took very little time to do, and is a very nice, and different looking Valentines Day display for the home, and as always at very little, to no cost. A+
Tuesday, November 17, 2020
Creating A French Country, Old World Christmas Step by Step
This year's theme to the home for Christmas is French Country/Old world
We have taken bits from here and there in the house, and put them together for a very simple and elegant Christmas. It took very little time, or expense.

A few dries flowers from the garden, add some rustic pieces, old Christmas treasures, and everyday objects. Keeping im mind the goal is a simple Christmas theme.

I think we have pulled it off. Let me know if you and your home share in this French Country/Old World look this year. If you haven't already, please subscribe to the YouTube Channel for more creative ideas!

Thursday, August 27, 2020
Fall Halloween Wooden Cats. Easy Crafts!
Fall Halloween Wooden Cats to decorate the home during the fall season. These are very simple to make out of left over boards, and so quick you won't believe it. #DIY #EasyCrafts #Fall #Halloween
Friday, October 12, 2018
How to make your own Fabric Ghost/Spirit for Halloween!
Have your own Resident Ghost this Halloween!
Think of the delight on the faces of your guest when they see your new resident spirit haunting your house. It is not as difficult as you think, and will certainly bring in that Halloween Spirit.
You can either choose to watch the You Tube Video above, or read the step by step directions below, or both! If you have not yet subscribed to the You Tube Channel, please do. I need all of the subscriptions I can get since You Tube changed their rules.

The first thing we do is make a shape for our head. I used plastic bags. Everyone has those, and usually too many. Here is a chance to put them to good use, and do a little de-cluttering of the kitchen at the same time.

Next we need a body. Here I used cardboard, but if you have a large doll, that would work too. Just cover it with plastic first.
When you have the shape you desire for the body, you can attach the head.
You might wish to try out your fabric on your shape to see how it looks.
I think we are getting into the "Spirit" of things here, and can now move on.

Next we move on to the fabric stiffener. I would say, if I should do this again, I will get the spray.
I think we are ready to begin the process. We will be pouring the liquid into the bowl, and placing the fabric into the bowl to cover it with the stiffener. You must cover all of the fabric. This part was very messy!

You are now ready to drape your cloth on to your body.
As you can see, I will be doing this outside. I have covered it all in plastic so it will be easy to remove when dry.
We now have the fabric covered with stiffener, and placed on our body.
You will have to arrange the fabric to give you the ghostly shape you are looking for.

When you have achieved the desired Spirit effect, you will then leave it overnight to dry. I left mind outside until I was ready to go to bed, and then brought it in, and sat it in a chair so it could dry the rest of the way. After just those few hours outside it was already pretty stiff.

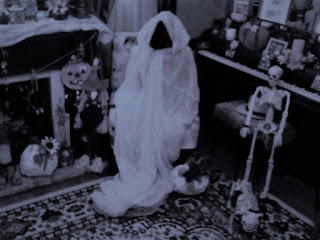
Our new Ghost has found a favorite spot in the living room. I think she looks quite at home now. As you can see, it is a very life like spirit, and just the right size for a spectral apparition.
I hope you have found a little inspiration from this video, as with all of the others I have posted. Let me know how it turns out for you, should you decide try it out for your home.

Think of the delight on the faces of your guest when they see your new resident spirit haunting your house. It is not as difficult as you think, and will certainly bring in that Halloween Spirit.
You can either choose to watch the You Tube Video above, or read the step by step directions below, or both! If you have not yet subscribed to the You Tube Channel, please do. I need all of the subscriptions I can get since You Tube changed their rules.

The first thing we do is make a shape for our head. I used plastic bags. Everyone has those, and usually too many. Here is a chance to put them to good use, and do a little de-cluttering of the kitchen at the same time.

Next we need a body. Here I used cardboard, but if you have a large doll, that would work too. Just cover it with plastic first.
When you have the shape you desire for the body, you can attach the head.
You might wish to try out your fabric on your shape to see how it looks.
I think we are getting into the "Spirit" of things here, and can now move on.

Next we move on to the fabric stiffener. I would say, if I should do this again, I will get the spray.
I think we are ready to begin the process. We will be pouring the liquid into the bowl, and placing the fabric into the bowl to cover it with the stiffener. You must cover all of the fabric. This part was very messy!

You are now ready to drape your cloth on to your body.
As you can see, I will be doing this outside. I have covered it all in plastic so it will be easy to remove when dry.
We now have the fabric covered with stiffener, and placed on our body.
You will have to arrange the fabric to give you the ghostly shape you are looking for.

When you have achieved the desired Spirit effect, you will then leave it overnight to dry. I left mind outside until I was ready to go to bed, and then brought it in, and sat it in a chair so it could dry the rest of the way. After just those few hours outside it was already pretty stiff.

Our new Ghost has found a favorite spot in the living room. I think she looks quite at home now. As you can see, it is a very life like spirit, and just the right size for a spectral apparition.
I hope you have found a little inspiration from this video, as with all of the others I have posted. Let me know how it turns out for you, should you decide try it out for your home.
Thursday, October 4, 2018
Make A Primitive, Spooky Halloween Trio!

It's that wonderful, magical, and haunting time of year again, and I have come up with a very quick and easy project to help get you in the Halloween mood.
Just follow the easy step by step instructions below, and you will be haunting in no time!

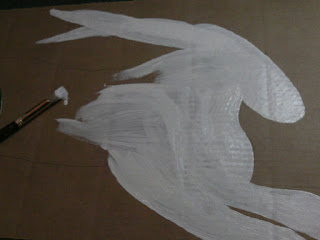
Begin by choosing your piece of wood. Draw the desired Halloween shapes you would like. Choose the colors, and begin painting. Remember, it's a primitive piece, so you don't have to be perfect.

One by one the project begins to take shape. As you fnish painting the base color you can begin to see what it is going to look like. Now we can begin putting in the details!

Give your ghoulish creature eyes, nose, and a mouth. A little touch of red on their eyes adds to the spookiness. I dipped a tooth brush in white paint, and spattered the entire piece with it. It adds to the look.

I also outlined the cat with white paint to bring him out of the background. Add a little string to hang your piece by, and it's all ready to put out! Happy Haunting, and Please Subscribe to the You Tube Channel for more!!!
Monday, September 10, 2018
A Fall Home Decorating Ideas Documentary
Fall is finally arriving, and it's time to get busy thinking of all of the ways you can decorate your home this year.
I have put together a few of my own ideas that I am using in the old Haunted House for Fall this year. Maybe you will become inspired by a few.
Below is the video with all of my ideas currently for this year, and a few photos just to fill up this page. Enjoy!
In the Kitchen

The Dining Room

The Living Room

Thursday, March 8, 2018
Easy Easter Crafts: Cardboard Cut Out and a Primitive Rabbit on Wood Hom...
Two East and Enexpensive Easter Crafts
First a Primitive Rabbit on Wood, and Second a Cardboard Cut Out Bunny
Like most of my homemade crafts, I like them to be done in a very short period of time, and made from things that I already have in the house, and recycled materials.

First for the primitive Rabbit on wood, I went down to the basement and chose a piece that I thought I could work with.
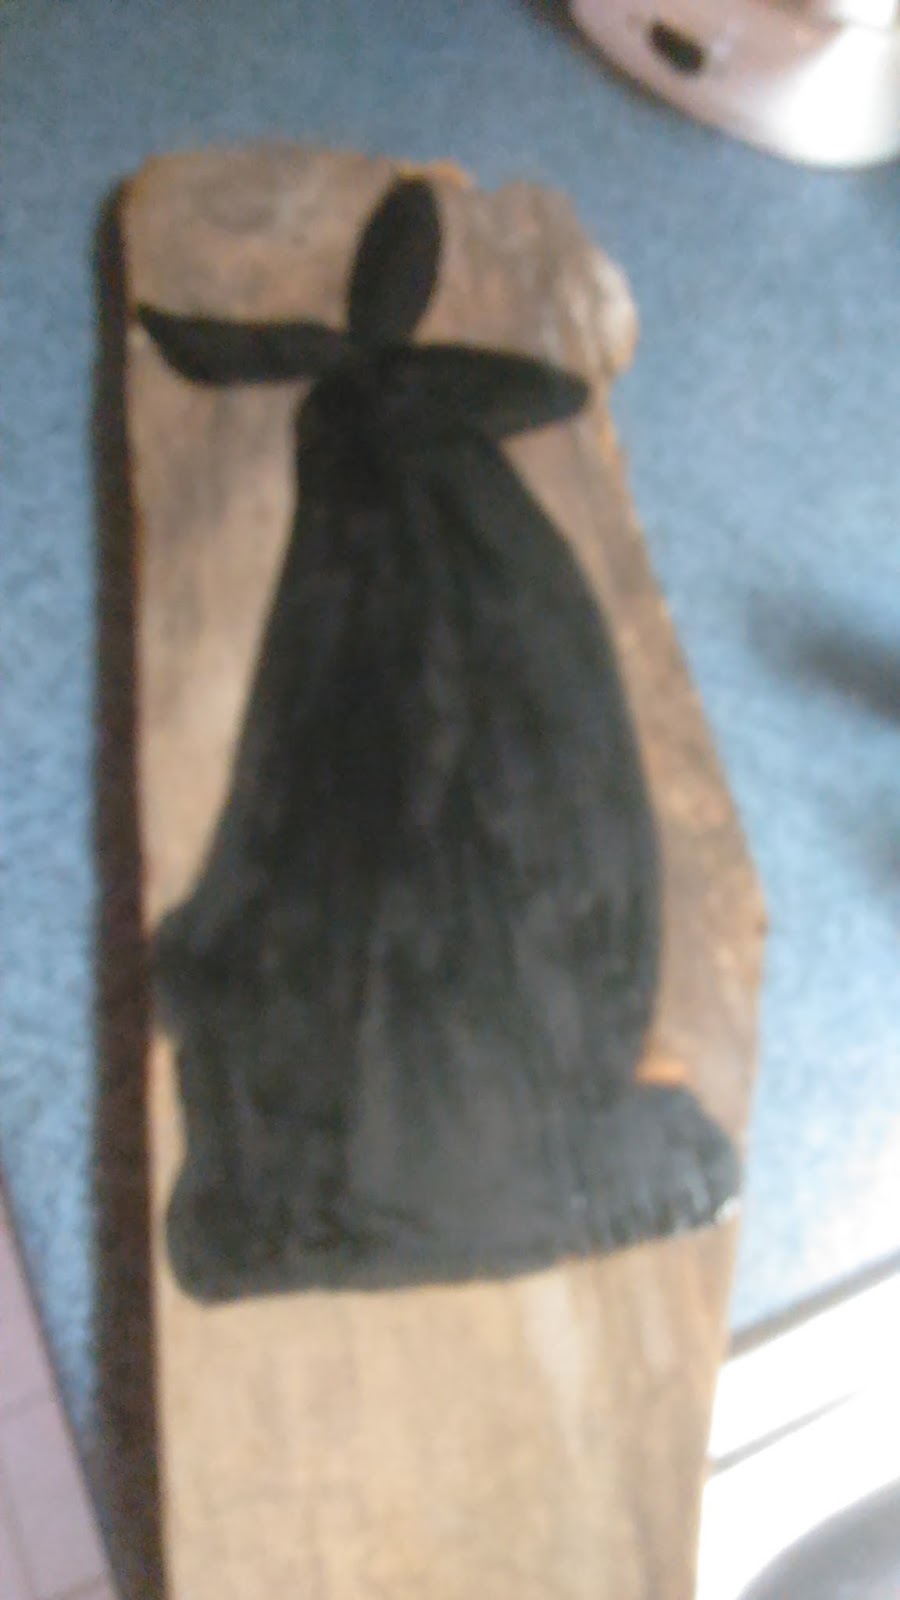
I sanded it, to clean off the dirt, and then drew the outline and painted my rabbit silhouette in black acrylic. Don't over think it, just draw and paint it.

Next I highlighted areas in white, like the arms, tail, mouth ears, and eyes. Finally, to give it an aged look, I sanded away some of the paint. I finished it by giving it a coat of polyurethane. Finally, the fun part, I hang it outside the front door.

On to the next bunny.
First I got my piece of cardboard, and drew the shape of bunny I wanted. Easy enough.
Next I was ready to cut out the bunny, and I painted it with a brown paint, but feel free to make it any color you choose.


I then spattered black paint using a tooth brush, cut and ties a ribbon around it's neck for decoration, and after that the bunny was all ready for Easter. If you choose to try out any of these craft projects please let me know how it went!

First a Primitive Rabbit on Wood, and Second a Cardboard Cut Out Bunny
Like most of my homemade crafts, I like them to be done in a very short period of time, and made from things that I already have in the house, and recycled materials.
First for the primitive Rabbit on wood, I went down to the basement and chose a piece that I thought I could work with.
I sanded it, to clean off the dirt, and then drew the outline and painted my rabbit silhouette in black acrylic. Don't over think it, just draw and paint it.

Next I highlighted areas in white, like the arms, tail, mouth ears, and eyes. Finally, to give it an aged look, I sanded away some of the paint. I finished it by giving it a coat of polyurethane. Finally, the fun part, I hang it outside the front door.

On to the next bunny.
First I got my piece of cardboard, and drew the shape of bunny I wanted. Easy enough.

Next I was ready to cut out the bunny, and I painted it with a brown paint, but feel free to make it any color you choose.


I then spattered black paint using a tooth brush, cut and ties a ribbon around it's neck for decoration, and after that the bunny was all ready for Easter. If you choose to try out any of these craft projects please let me know how it went!

Tuesday, February 13, 2018
No Cost Low Cost Exquisite Easter Crafts you can make Yourself. Primitive Rabbit
Looking for an easy DIY Craft for you and the kids?

How about this primitive Rabbit? It looks great, it's very easy, and may cost you nothing to do. Also, if you have kids, it's simple enough that they will find it fun too!
A Primitive Easter Rabbit, or even for an everyday decoration in the home, that you can make by yourself in about an hour. This is a very easy no cost, or low cost craft that is fun, and quick for anyone to try out.

Begin by drawing your selected image onto the piece of cardboard. I know, it's cardboard, but don't worry, it's going to look great when you are finished. You won't believe your eyes.
Paint your image. Don't worry about the areas that show through underneath, it will only add to the "aged" look of the piece. After all, it is a primitive, and that is what gives them their charm.

Next you can add your shading, and spots of "wear" to the piece, and cut it out. Note: For me, cutting it out was actually the hardest part of the entire prokect. Now the fun part! It is ready for a little fancy decorating, as you see fit. I used a few twigs from the yard, Spanish moss, and left over ribbon for mine.

You are all finished, and ready to put it on display. These pieces are very fast, and also easy enough for kids to do as well.
Below are a few more Rabbits that I have added to my collection, and as you can see, they are wonderful, fun, and festive! I hope you try this project, and as always, if you do...let me know!

The Dining Room Table Rabbit

Rabbit in the Fireplace

Two Bunnies in a Bedroom

How about this primitive Rabbit? It looks great, it's very easy, and may cost you nothing to do. Also, if you have kids, it's simple enough that they will find it fun too!
A Primitive Easter Rabbit, or even for an everyday decoration in the home, that you can make by yourself in about an hour. This is a very easy no cost, or low cost craft that is fun, and quick for anyone to try out.

Begin by drawing your selected image onto the piece of cardboard. I know, it's cardboard, but don't worry, it's going to look great when you are finished. You won't believe your eyes.

Paint your image. Don't worry about the areas that show through underneath, it will only add to the "aged" look of the piece. After all, it is a primitive, and that is what gives them their charm.

Next you can add your shading, and spots of "wear" to the piece, and cut it out. Note: For me, cutting it out was actually the hardest part of the entire prokect. Now the fun part! It is ready for a little fancy decorating, as you see fit. I used a few twigs from the yard, Spanish moss, and left over ribbon for mine.

You are all finished, and ready to put it on display. These pieces are very fast, and also easy enough for kids to do as well.
Below are a few more Rabbits that I have added to my collection, and as you can see, they are wonderful, fun, and festive! I hope you try this project, and as always, if you do...let me know!

The Dining Room Table Rabbit

Rabbit in the Fireplace

Two Bunnies in a Bedroom
Subscribe to:
Posts (Atom)