It will soon be Easter Time again, and now is the time to get busy planning on what you will be viewing for the holiday.
This year, like those in the past will be different, and hopefully interesting, and inspirational to you, and yours!
Showing posts with label cheap. Show all posts
Showing posts with label cheap. Show all posts
Tuesday, March 7, 2023
Friday, November 18, 2022
A Different Kind Of Christmas Decorating. Come Celebrate with me!
I wanted something less cluttered, lighter, and different for Christmas this year, and here is what I accomlpished.
I call it a different kind of Christmas, because for me it is. I hope you like it just as much as in the past years, but if not, you can always vist Christmases past in the videos.
I call it a different kind of Christmas, because for me it is. I hope you like it just as much as in the past years, but if not, you can always vist Christmases past in the videos.
Thursday, October 27, 2022
Three New Paintings by davids Ghost. Create!
I have been trying to get these paintings up, one because there are more to post, and I will be painting again, and things will be piling up before you know it, and I don't like keeping too many photos on the phone. I know, some people have lots of photos, but I still think it slows down the phone, but that's me...
Anyway, here are three new paintings. I hope you like them. n any case, let me know what you think, and be creative!
Anyway, here are three new paintings. I hope you like them. n any case, let me know what you think, and be creative!
Tuesday, October 4, 2022
Decorating from Fall to Halloween How To

IT'S TIME FOR DECORATING AGAIN, AND IT IS FOR THAT VERY SPECIAL NIGHT OF ALL HALLOWS EVE!
Join me, in the Old Haunted House for new, and spooky Halloween ideas, and frights to behold. Most everyones second favorite holidays to dress up the home for, and it takes nothing but imagination, and just a little fun work.
Tuesday, March 1, 2022
Create! I Felt Like Doing A Painting Today
It seemed to be the right day for doing a painting. You get to see it being done step by step.
And here it is in what is probably it's finished state. Pre-framed.

And here it is in what is probably it's finished state. Pre-framed.
Wednesday, January 19, 2022
One Valentine's Day, Two Different Looks. Which is Better Traditional o...
We are trying out two different looks for Valentines Day decorating to see which we like the best. These are very easy crafts that you can do with the kids, and they cost very little in time, or cash, but they still look great. Let me know what you think.
If you wish to see more inexpensive decorating ideas for the Holidays, or everyday, please subscribe to the YouTube Channel!!!
If you wish to see more inexpensive decorating ideas for the Holidays, or everyday, please subscribe to the YouTube Channel!!!
Thursday, October 14, 2021
Easy Fall Crafts I have made, and you can too!
Here we have 3 very easy to do Fall craft projects you can make by yourself, or with the kids. Easy enough that everyone can get involved.
Decorating for fall doesn't need to cost a lot of money, just use what you already have, and change it up a little. Using your imagination is all of the fun, and you come up with a unique look for your home!


Decorating for fall doesn't need to cost a lot of money, just use what you already have, and change it up a little. Using your imagination is all of the fun, and you come up with a unique look for your home!


Friday, January 1, 2021
3 Quick, Easy, and Free French Country Paper Projects/DIY Home Decor
We are going to start the New Year out right, and add a little happiness to our living space!
It is done with a little creativity, and no money, so we can all do it if we want to.
I had a little free time the other day, and and needed a project to fill that time, so here we have the results of that. I hope you like these 3 things.

Our first piece was inspired by a packace I had received in the mail, and thought the box it came in had a very nice shape, and that something could be done with it...so came the other ideas.
I covered (glued) it with wrinkeled up white paper, and used my French Country stencile to decorate around it. Now I have a French Country pillar at no cost.
I placed a little metal bird upon it, and it took it's place next to a chair in the dining room. It took very little time, and it looks great!

Next I printed out a few sheets of French Country script, and covered a couple of books with it, placed them on top of a desk in the Library, put a metal birdcage on top, and it was finished. Looks very nice for a couple minutes of my time.

The last project was an old cigar box, and again I covered it in paper, and used my French Country stencil over it, let it dry, and it was ready to be placed on top of the chifferobe in the living room. All 3 of these projects took no money, or even much time to do, but bring just a little more fun to my living space, and will be able to decorate my home for some time to come. I hope you find a little inspiration from these, and the other ideas I have posted, and let me know what you think!
Thursday, May 28, 2020
From Old Wooden Pallet to Nice Garden Decor at No Cost
Today we are creating a little more primitive garden decor, this time out of a discarded wooden pallet. It took very little time, and cost nothing since I always have craft paints. Hopefully you will like this (don't forget to hit "like"), and subscribe for even more great decorating ideas. Also check out the other videos for more inspirational decorating ideas, for you and the kids, on a budget!
Thursday, March 26, 2020
A Calming, lightening Feng Shui Bedroom Re Do for very little cost
We are doing a bedroom makeover using Feng Shui as out guideline.
It will transform from dark, and red to light, and airy, and much much happier
As always, don't forget to add a comment, and let me know what you think!
It will transform from dark, and red to light, and airy, and much much happier
As always, don't forget to add a comment, and let me know what you think!
Friday, February 28, 2020
A DIY Kitchen Island You Can Make Yourself and SAVE
Do you want a Kitchen Island that looks like an old piece of furniture, but you don't have a lot of money to spend on one? Why not make your own inexpensive one, and it can be just how you want it to look. Here is what I did for my kitchen out of an old shelf stand that was in the basement when I bought the house.
Friday, October 12, 2018
How to make your own Fabric Ghost/Spirit for Halloween!
Have your own Resident Ghost this Halloween!
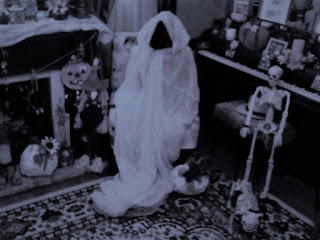
Think of the delight on the faces of your guest when they see your new resident spirit haunting your house. It is not as difficult as you think, and will certainly bring in that Halloween Spirit.
You can either choose to watch the You Tube Video above, or read the step by step directions below, or both! If you have not yet subscribed to the You Tube Channel, please do. I need all of the subscriptions I can get since You Tube changed their rules.

The first thing we do is make a shape for our head. I used plastic bags. Everyone has those, and usually too many. Here is a chance to put them to good use, and do a little de-cluttering of the kitchen at the same time.

Next we need a body. Here I used cardboard, but if you have a large doll, that would work too. Just cover it with plastic first.
When you have the shape you desire for the body, you can attach the head.
You might wish to try out your fabric on your shape to see how it looks.
I think we are getting into the "Spirit" of things here, and can now move on.

Next we move on to the fabric stiffener. I would say, if I should do this again, I will get the spray.
I think we are ready to begin the process. We will be pouring the liquid into the bowl, and placing the fabric into the bowl to cover it with the stiffener. You must cover all of the fabric. This part was very messy!

You are now ready to drape your cloth on to your body.
As you can see, I will be doing this outside. I have covered it all in plastic so it will be easy to remove when dry.
We now have the fabric covered with stiffener, and placed on our body.
You will have to arrange the fabric to give you the ghostly shape you are looking for.

When you have achieved the desired Spirit effect, you will then leave it overnight to dry. I left mind outside until I was ready to go to bed, and then brought it in, and sat it in a chair so it could dry the rest of the way. After just those few hours outside it was already pretty stiff.

Our new Ghost has found a favorite spot in the living room. I think she looks quite at home now. As you can see, it is a very life like spirit, and just the right size for a spectral apparition.
I hope you have found a little inspiration from this video, as with all of the others I have posted. Let me know how it turns out for you, should you decide try it out for your home.
Wednesday, September 26, 2018
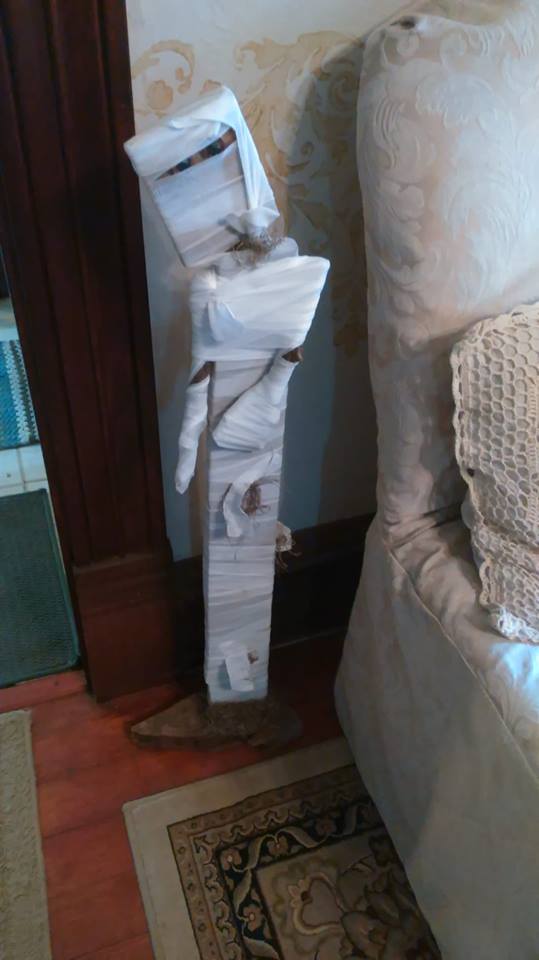
Halloween Decorations, How To Make a Primitive Mummy! Fast and Easy
I am always looking at decorations, and wondering if I could make that myself, and save money. This Primitive Halloween Mummy turned out to be very easy, and quick to do. It's so easy you could have the kids making their own in no time with things lying around the house.
Below I have included the photos for each step of the craft project.

Step 1: Pick out your 3 pieces for the Mummy (head, body, and base).

Step 2: Attach the head to the body. I used a metal piece with 4 holes, and drilled in 4 screws.

Step 3: Attach the body to the base. I used 2 screws going in through the bottom of the base.

Step 4: Wrap the Mummy in gauze, and add 2 eyes, and 2 arms. I placed Spanish moss here and there, and on the base just for an added "aged" effect. After that you are all finished, and ready to put your Mummy out for Halloween! See how easy that was. You may want to make an entire Mummy family it goes so fast. Happy Haunting!
Below I have included the photos for each step of the craft project.

Step 1: Pick out your 3 pieces for the Mummy (head, body, and base).

Step 2: Attach the head to the body. I used a metal piece with 4 holes, and drilled in 4 screws.

Step 3: Attach the body to the base. I used 2 screws going in through the bottom of the base.
Step 4: Wrap the Mummy in gauze, and add 2 eyes, and 2 arms. I placed Spanish moss here and there, and on the base just for an added "aged" effect. After that you are all finished, and ready to put your Mummy out for Halloween! See how easy that was. You may want to make an entire Mummy family it goes so fast. Happy Haunting!
Monday, September 10, 2018
A Fall Home Decorating Ideas Documentary
Fall is finally arriving, and it's time to get busy thinking of all of the ways you can decorate your home this year.
I have put together a few of my own ideas that I am using in the old Haunted House for Fall this year. Maybe you will become inspired by a few.
Below is the video with all of my ideas currently for this year, and a few photos just to fill up this page. Enjoy!
In the Kitchen

The Dining Room

The Living Room

Tuesday, March 20, 2018
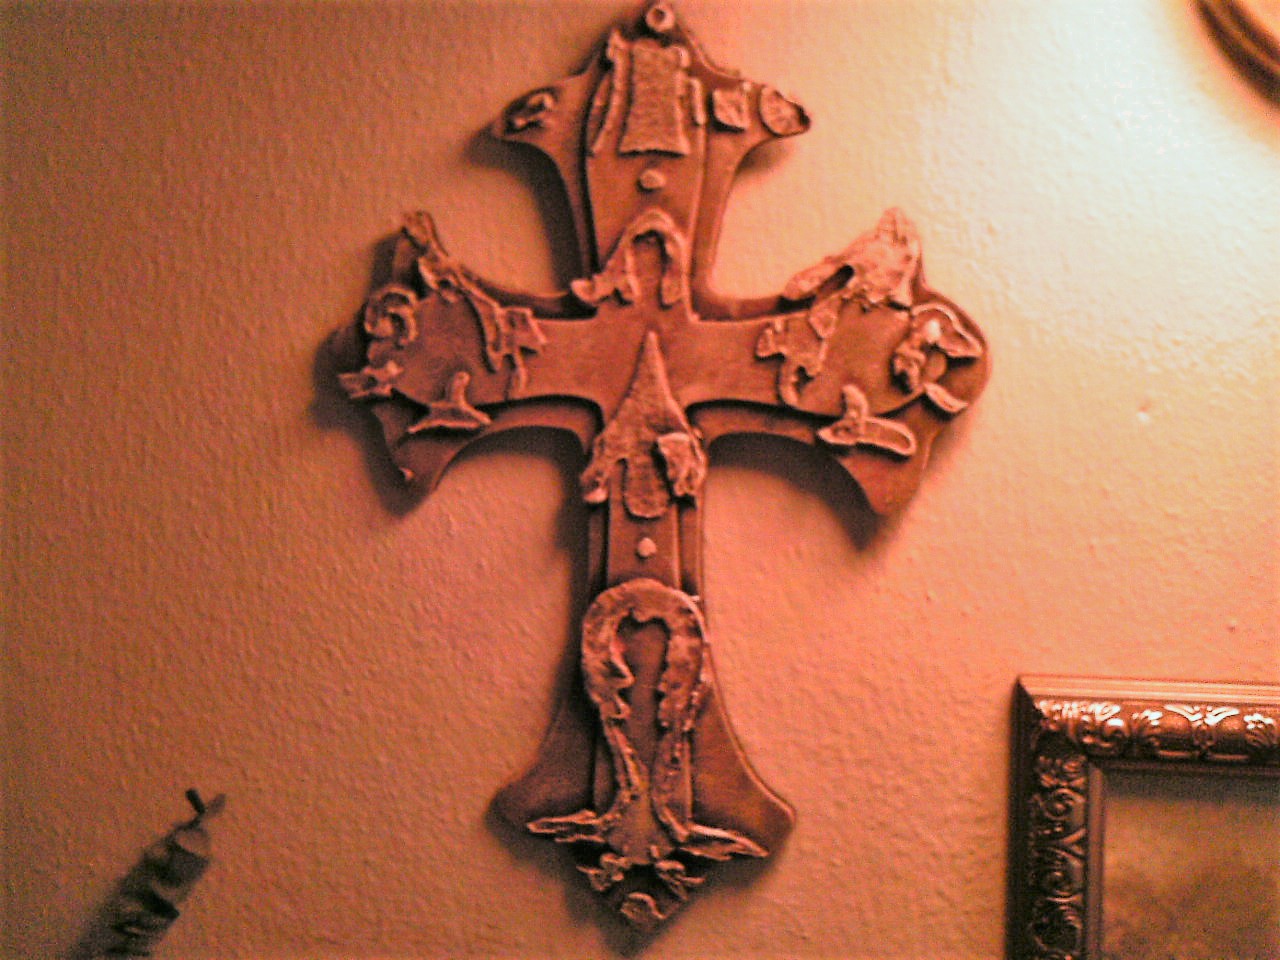
Transforming a Dollar Store find into a Celtic Cross Amazing DIY
From Dollar Store Find to Celtic Cross in no time.
Amazing craft Projects from a great YouTube Channel.
Don't forget to Subscribe to the Channel for more Crafty Ideas!
 We begin by using our plaster stencil to add a 3 dimensional design to the plain wooden cross. I centered the stencil on top of the cross, and applied the plaster to the stencil. Let dry overnight before moving on to the next step.
 Apply your first color of acrylic paint. I have chosen black so I will have that darker color in the crevasses when it is finished. It also helps to achieve that aged look. Allow that color to dry.
 For the next step, dry brush your next color on top of the black, being careful not to coat the entire cross, and cover the black. Remember we want that black to show at the end.
 I also added a light beige to the top areas of the plaster to further highlight the details. After this step you are done, and ready to hang your new Celtic Cross in your home. How easy was that, and the effect is indeed amazing! Please don't forget to Subscribe to the YouTube Channel for more craft projects to come in the future.


Amazing craft Projects from a great YouTube Channel.
Don't forget to Subscribe to the Channel for more Crafty Ideas!


Monday, February 26, 2018
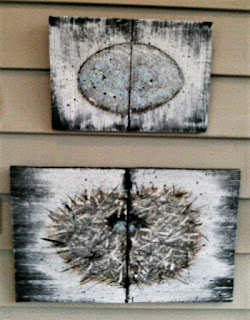
How to create your own Primitive and Stunning Easter Decorations DIY Crafts
Easter Decorating made easy. Primitive, and Stunning Easter Crafting in no time at all!
 Looking for a not so typical Easter Craft Project that the entire family can take part in
Look no further, because here it is. Not only do these pieces look great, but they really are easy, and quick to do, and will certainly brighten up your home for the Easter Season. In fact they are nice enough to leave out all year long!
Though the video will explain everything you need to know step by step, I will also post some of the photos, and give a brief synopsis of what I have done to create these one of a kind little art projects.

After you have picked out your wood shapes, you can base coat them in black. Black is very important, because you will be uncovering some of that color latter in the process.
 Dry brushed a little white on top of the black, tie a jute cord in the middle (if you wish it to look like two boards when you are finished). Next you can begin layering your colors. I chose brown, then beige, blue, and finally a little white.


For the birds nest, get a tool with a sharp end to scrape across the nest to simulate sticks. When you scrape it you will see the black underneath is what helps the nest to look like many separate sticks woven in to a nest.

Finally, spatter black on to the pieces with a tooth brush. Doing this will add depth to the piece, and believe me, it does a lot for the finished project.

Now you can remove the jute cord (if you used it) I also used 2 screws, and jute cord on the back to create a way to hang the boards.
I hope you will try this fun, and different kind of Easter Craft for your home, and please let me know what you thought of it!

Look no further, because here it is. Not only do these pieces look great, but they really are easy, and quick to do, and will certainly brighten up your home for the Easter Season. In fact they are nice enough to leave out all year long!
Though the video will explain everything you need to know step by step, I will also post some of the photos, and give a brief synopsis of what I have done to create these one of a kind little art projects.

After you have picked out your wood shapes, you can base coat them in black. Black is very important, because you will be uncovering some of that color latter in the process.


For the birds nest, get a tool with a sharp end to scrape across the nest to simulate sticks. When you scrape it you will see the black underneath is what helps the nest to look like many separate sticks woven in to a nest.

Finally, spatter black on to the pieces with a tooth brush. Doing this will add depth to the piece, and believe me, it does a lot for the finished project.

Now you can remove the jute cord (if you used it) I also used 2 screws, and jute cord on the back to create a way to hang the boards.
I hope you will try this fun, and different kind of Easter Craft for your home, and please let me know what you thought of it!
Tuesday, February 13, 2018
No Cost Low Cost Exquisite Easter Crafts you can make Yourself. Primitive Rabbit
Looking for an easy DIY Craft for you and the kids?

How about this primitive Rabbit? It looks great, it's very easy, and may cost you nothing to do. Also, if you have kids, it's simple enough that they will find it fun too!
A Primitive Easter Rabbit, or even for an everyday decoration in the home, that you can make by yourself in about an hour. This is a very easy no cost, or low cost craft that is fun, and quick for anyone to try out.

Begin by drawing your selected image onto the piece of cardboard. I know, it's cardboard, but don't worry, it's going to look great when you are finished. You won't believe your eyes.
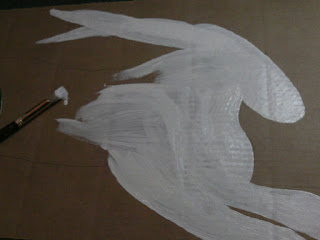
Paint your image. Don't worry about the areas that show through underneath, it will only add to the "aged" look of the piece. After all, it is a primitive, and that is what gives them their charm.

Next you can add your shading, and spots of "wear" to the piece, and cut it out. Note: For me, cutting it out was actually the hardest part of the entire prokect. Now the fun part! It is ready for a little fancy decorating, as you see fit. I used a few twigs from the yard, Spanish moss, and left over ribbon for mine.

You are all finished, and ready to put it on display. These pieces are very fast, and also easy enough for kids to do as well.
Below are a few more Rabbits that I have added to my collection, and as you can see, they are wonderful, fun, and festive! I hope you try this project, and as always, if you do...let me know!

The Dining Room Table Rabbit

Rabbit in the Fireplace

Two Bunnies in a Bedroom
Wednesday, January 24, 2018
How to make a Primitive Wooden Valentine Heart DIY Craft

This Primitive Wooden Valentine Heart is certainly one of them. It's so easy that your kids will have fun making it as well.
Just a few items that you need, and most probably already have, and you are on your way to having a lot of Valentine's day fun!
Tuesday, January 23, 2018
The Old Haunted House is all Decorated for Valentine's Day

Now is the time to be thinking of what you will be doing for Valentine's Day, and how you want your house to look. You could come home to a very happy, and romantic place with just a little embelishing. Doesn't that sould like fun.
Join me in this Valentine's day House Tour, and maybe walk away with a few DIY ideas of your own!
Saturday, November 18, 2017
How to make your own Cone Christmas Trees. Quick, Easy and Inexpensive

1: Take your poster board, and a pencil with a string tied to it, the length equal to the length (shorter) of the poster board. You will be using this to draw your curved line on the poster board. This is going to give you the flat bottom of the cone to sit on...so it's not a crooked tree.

3: Cut the curved line that the pencil has drawn, and tape the 2 edges together to form a cone. I also taped the inside just to make sure that it would not come apart.


Subscribe to:
Posts (Atom)